Multiuser Manager Functionality
- Introduction
- Login to the Administrative Control Panel
- Creating an Account for a User
- Finding a User's Account
- Restricted Trial Account
- Activating a User Account for Billing
- Usage Time Ending Date for User Account
- Assigning Trading Account to User Sierra Chart Account
- Deactivating Service Package Billing for an Account for a User
- Updating a User's Account Information
- Changing a User's Service Package
- Providing the Denali Exchange Data Feed
- Billing and Payments
- Adding and Removing Authorized Symbol Service Codes for User
- Order Fill Transaction Fee Billing
Introduction
The Sierra Chart access control system supports multiuser functionality whereby a single Sierra Chart account, called the manager account, can act as an administrator of other associated Sierra Chart accounts.
This particular Sierra Chart account is not used to log into Sierra Chart. It is only used as an administrator through the web-based control panel for the Multiuser Manager account functionality. Using this account to log into Sierra Chart is not allowed.
This functionality is called the Multiuser Manager. If you are provided the Multiuser Manager, you will be provided access to a web-based administrative control panel where you can manage access to Sierra Chart for your users). Each of your users will have a separate account that you create and assign to them and can manage various aspects on such as controlling the Service Package level, assigning simulated trading accounts, activating the Exchange Data Feed and exchange fees, controlling per transaction fee billing, etc.
After creating this user account, it is then necessary to make this account active for the user. When this account is active, then your user can use it and your manager account will be billed monthly for this user subaccount, according to the terms of the agreement.
You can disable this user account and make it inactive so you are not billed for it and so the functionality is disabled for the user.
You can change the password on this user account as needed.
Each user of yours needs to be given their own account. However, if you no longer have a particular user, the account they had can be given to another user if you want. You will want to change the Name and Password fields for it in this case.
To learn about the pricing terms of the Multiuser Manager functionality, refer to Reseller Program.
Login to the Administrative Control Panel
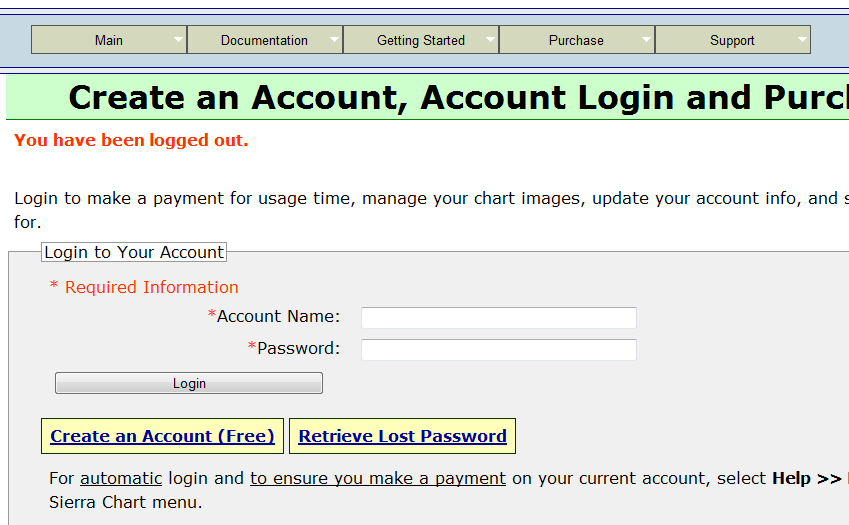
- The very first step is to log into the administrative control panel.
- Go to the Login page for the administrative control panel.
- Enter your Admininistrative Account Name and Password.
- Press the Login button.
Creating an Account for a User
- The next step is to create an account for one of your users.
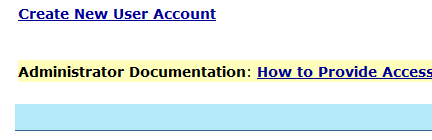
- Click on the Create New User Account link to open a new page with the form to create an account. Refer to the image below.
- The form will be prefilled for you. The e-mail address will be set to your administrator account e-mail address. However, it can be changed to the user's email address if you require. You can optionally modify any of the fields that are modifiable. You can change the First and Last Name, Account Name, Address and other fields as required.
- When you are ready to create the account, press the Create Account button. If you set the e-mail address to the user's e-mail address, then the user will get an e-mail with their Sierra Chart Account Name and Password which serves as their login information for Sierra Chart. Therefore, it may be a good idea to specify the user's email address rather than your email address.
- You will be redirected back to the main administrative control panel page after creating the account. At the top of the page will be displayed the Account Name and Password that will need to be communicated to your user if they did not receive the email with this information or you did not specify the users email address on the form.
- You will need to instruct your user to download and install Sierra Chart if they have not already done so. Direct them to the Software Download page for that.
- To create an account for another user, follow step 2 above again.
- If your Multiuser Manager account provides trials to your users, the user will have a trial but this trial may need to be activated by Sierra Chart Support. Allow up to 24 hours for the activation. If this activation has not been done, start an Account Support Ticket about this.

Finding a User
- Once you are logged into the administrative control panel, you can then look up any particular user to manage their account, such as activating, deactivating and changing the password.
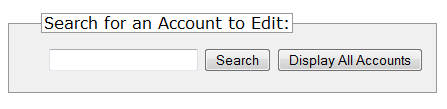
Enter part of the Account Name or Email address of the user you want to edit in the Search for an Account to Edit box located near the top of the main control panel page and press the Search button. Or press the Display All Accounts button. Refer to the image below. - You can also directly access the search page.
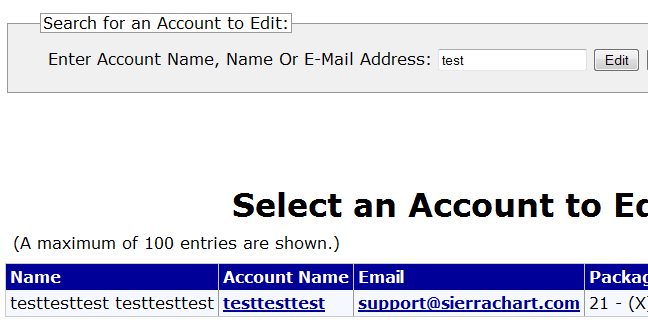
- You will see a list of accounts that match your specification. In this list, locate the account that you want to modify and click on the Account Name to edit it.
If there was an exact match, you will automatically be taken back to the main administrative control panel page and be able to edit that account. Note that you can modify your search criteria if you get too many or no results. - If the search box is blank, then you will get a list of all of the accounts for your Multiuser Manager account. Up to 100 results will be displayed.
Restricted Trial Account
- In some cases when an account is programmatically created using the Web API or manually following the Creating an Account for a User instructions, the account could be restricted when the user begins to use the account if it is detected that the user already had 31 days of trial time of using Sierra Chart previously.
- The user will know this is the case because when they start Sierra Chart, they will see a notice stating that the Account Requires Activation. If the account requires activation, it can only be activated by Sierra Chart Support. Sierra Chart Support is aware of accounts that require activation. They undergo a review and if the user is entitled to an activation they will receive it and be notified by email about this. This review usually happens within 24 hours.
- Below is an indication of what you will see when editing the user account when Sierra Chart support has activated a trial. This confirms that Sierra Chart support has activated the account. However, if you do not see that it is activated, the account may not have been restricted to begin with and it does not require a manual activation.

- If the user is not entitled to an activation, this is because the user already had a trial and they are not entitled to another trial. This is a Sierra Chart system wide trial limitation for users. Therefore, we cannot provide that user a trial. In this case you will need to activate the user account for billing to your Multiuser Manager account at this time for the user to have access to Sierra Chart. However, the trial time already on the account will remain and therefore the billing for the first month will be reduced because of this.
- To activate a user account for billing to your Multiuser Manager account, follow the Activating a User Account for Billing instructions
- If Sierra Chart support activates the user account, the user will be notified by email about this.
Activating a User Account for Billing
- When a user's trial has ended, and you want them to be able to continue to use Sierra Chart, you need to activate their account. When you activate the user's account it will be immediately billed to your Multiuser Manager account, at the agreed price per month. Based upon the time in a month when you activate an account, the charge to your account for that user account will be prorated.
- After a user account has been activated, in subsequent months your Multiuser Manager account is only billed for the user account if the user actually logged into Sierra Chart during that month. If they logged in, even if once, the full monthly cost is applied to your Multiuser Manager account for that single user account.
- The first step with activating a user's account is to find the user's account, unless you are already editing the user's account. After a new account is created it is automatically set as the account that is being edited. If you need to find a user's account, refer to the Finding a User instructions.
Once you are editing the user's account, you will see Editing: [Account Name] displayed on the main Control Panel page. - Go to the Admin Panel tab.
- To activate the account, and add them to your monthly invoice, select the Service Package required and press the Activate Account button in the Multiuser Manager Activation and Deactivation for User Account frame.
- You will get a confirmation window. Make sure that the correct account is being activated and then simply press OK on this confirmation. You will not see this confirmation if you have Java Script disabled.
- You will see an Action Result box at the top of the page indicating the result of the action.

Usage Time Ending Date for User Account
Upon activation of a user account the multiuser manager controls, the usage time ending date of that account will be extended to the end of the current month if the existing ending date of the account is before the end of the current month. This happens immediately if there is a sufficient Services Balance to pay for the activated user account.
If the usage time ending date of the user account is already beyond the end of the current month, then there is no further extension of the ending date done at the time of the activation.
When a new month begins, the usage time ending date of a user account is extended to the end of the month, when the user logs in to Sierra Chart, or if Sierra Chart is running, if there is a sufficient Services Balance on the Multiuser Manager account that is administering the user's account.
If your account is set to prepay, it is important to make sure your Services Balance is sufficient enough to pay for the usage time ending date extensions for the activated accounts, which occur at the beginning of the month for the users using Sierra Chart.
Assigning Trading Account to User Sierra Chart Account
If a user you are managing wants to use the Sierra Chart Order Routing Service, follow the instructions below to assign a trading account to the user account.
This feature is only available if your multiuser manager account has been permissioned for this functionality by Sierra Chart Support.
- Find the user's account, unless you are already editing the user's account. If you need to find a user's account refer to the Finding a User instructions. Once you are editing the user's account, you will see Editing: [Account Name] displayed on the main control panel page.
- Go to the Admin Panel tab.
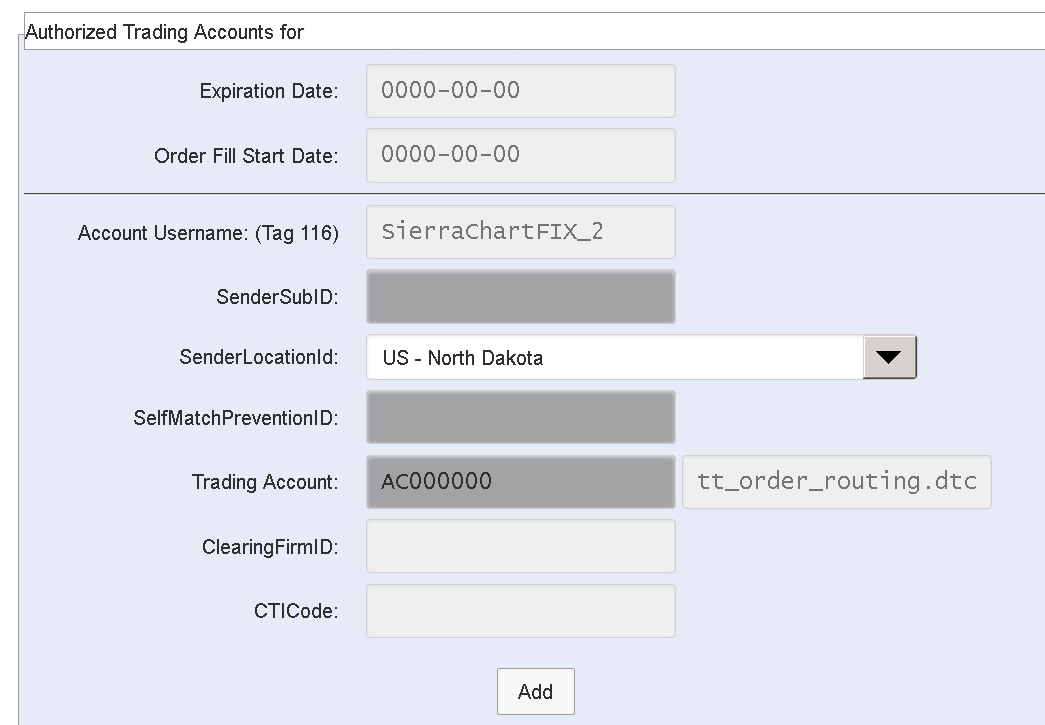
- Scroll to the Authorized Trading Accounts for frame on that page.
- Set the SenderSubID which is FIX Tag 50 for the user. This is a required field.
- Set the SenderLocationID from the drop-down list box. This Is a Required Field.
- Enter the Trading Account identifier as Set up on the TT System. This is a required field and is validated to ensure that the correct Trade Account is being assigned.
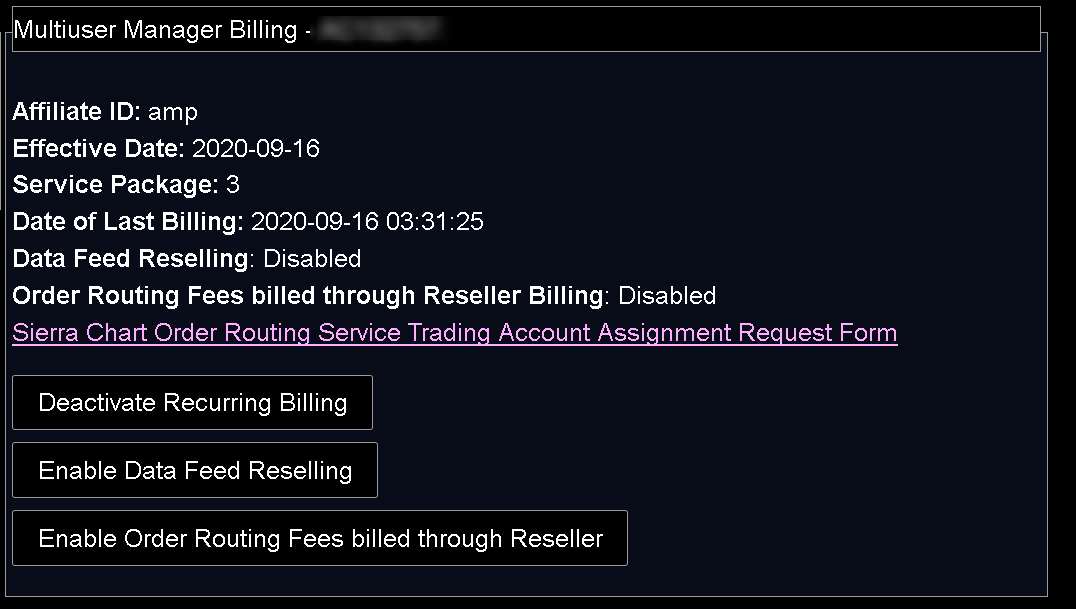
Deactivating Service Package Billing for an Account for a User
- The first step with deactivating Service Package billing for a user's account is to find the user's account, unless you are already editing the user's account. If you need to find a user's account refer to the Finding a User instructions. Once you are editing the user's account, you will see Editing: [Account Name] displayed on the main control panel page.
- Go to the Admin Panel tab.
- To deactivate the recurring billing for the Service Package, press the Deactivate Recurring Billing in the Multiuser Manager Billing frame.
- You will get a confirmation window. Press OK on this confirmation. Note, you will not see this if you have Java Script disabled.
- The page will be reloaded. You will see an Action Result indicating the result of the action, at the top of the page.

Updating a User's Account Information
- To change the password for a user's account, change the name, or update the user's e-mail address, then follow these steps.
- The first step is to find the users account. Refer to the Finding a User instructions. Once you are editing the user's account, you will see Editing: [Account Name] displayed on the main control panel page.
- Go to the User View tab.
- Click on the Manage Account Information link. You will be taken to a form where you can modify the account information. The other account details generally should be left the same and do not need to be changed. For example, you do not need to specify the user's address. The e-mail address does not necessarily have to be set to the user's e-mail address, however when you choose the option to reset the password, the new password is sent to this e-mail address.
Changing a User's Service Package
To change the Service Package for a user's account, then follow these steps.
- The first step is to find the users account. Refer to the Finding a User instructions. Once you are editing the user's account, you will see Editing: [Account Name] displayed on the main control panel page.
- Go to the Admin Panel (tab).
- Deactivate the billing.
- Reactivate the billing with the needed Package.
Providing the Denali Exchange Data Feed
It is supported to activate the Denali Exchange Data Feed for a Sierra Chart User account that you are managing under your multiuser account.
Support for activating the Denali Exchange Data Feed on a user account managed by your multiuser account is controlled by Sierra Chart support, and access for it has to be granted.
The way that billing is handled for providing the Denali Exchange Data Feed is the Multiuser Manager account will be billed for the data feed from the Multiuser Manager Account Services Balance.
If your Multiuser Manager Account is allowed to activate the Denali Exchange Data Feed for a user account, then follow the instructions below to activate the Denali Exchange Data Feed, for a user account you are managing.
- Make sure that your Multiuser Manager account is enabled for providing the Denali Exchange Data Feed. To enable this, contact support by filling out an Account Support Ticket.
- The monthly fees for the Denali Exchange Data Feed must be prepaid unless credit is granted for this feature to your Multiuser Manager Account. If credit is not granted, then you will need to make sure you have a sufficient balance on your Services Balance for the data feed services you would like to activate for your users.
- To make a payment to the Services Balance you can make a payment here. Bank wire transfer payment options are available.
- Find the users account that you want to activate the Denali Exchange Data Feed on, in order to begin editing it.
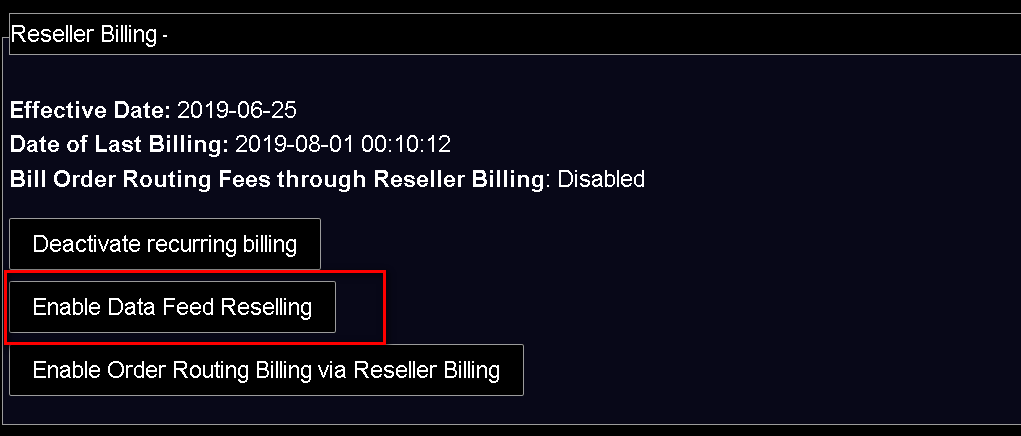
- Select the Admin Panel tab in the control panel.
- In the Reseller Billing frame, press the Enable Data Feed Reselling button.
- You will notice the text Data Feed Reselling: Enabled in the Reseller Billing frame indicating it is now possible to activate the data feed on the user's account. Refer to the image below.
- Go to the Services Activation page.
- Scroll down to the Denali Exchange Data Feed frame.
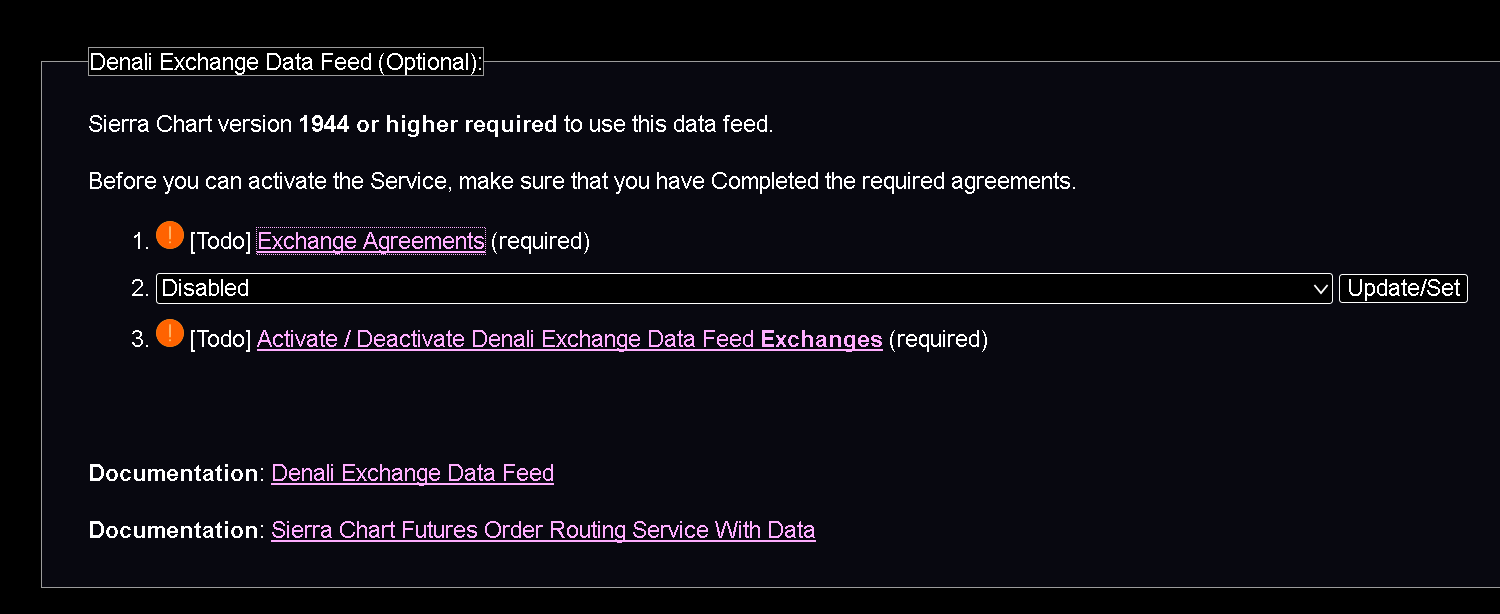
- Click on the Exchange Agreements link.
- Click on the Send User Agreements Links button, to notify the user by email to complete the agreements.
- In the list box by item #2, select Denali Exchange Data Feed for Other Servicesfrom the list. The list box shows the cost of the data feed remaining for the rest of the month.
- Press the Update/Set button.
- Click on the Activate / Deactivate Denali Exchange Data Feed Exchanges button to go to the page for activating the exchanges.
- On the Denali Data Feed Exchanges, press the Activate button by each exchange that you require. Use *great caution* before activating an exchange because once an exchange is activated and if there is a cost for the exchange in the month, it is billed in full for that month even if there is one hour left in the month. There are no refunds. And you need to understand what particular market data access each exchange provides. Contact us through an Account Support Ticket if you have any question about exchange fees. Once again exchange fees are nonrefundable.
- For more details, refer to Denali Exchange Data Feed Setup Instructions.
Important: If your multiuser Manager account's Services Balance does not contain a sufficient amount to fully cover the cost of the data feed renewals at the start of the month, only the user accounts where there is a sufficient balance to renew the real-time data connections and exchanges will get renewed and the others will become canceled.
Manual Authorization of CME Trading Account
In the case where you have activated a CME Group exchange fee which requires a trading account and the user does not have a trading account with a supported trading service, a manual verification that the user has a trading account is necessary. This is not the preferred method and it has a significant administrative burden and the user can lose access to the exchange.
The procedure for the manual verification is as follows:
- The clearing company which holds the trading account needs to send an email to [Java Script Is Required. To View The Email, enable Java Script] near the end of each month stating the user's name and confirming they have a funded futures trading account. The email needs to be sent from an email address of the clearing company.
- This will be reviewed by Sierra Chart support and then we will manually specify that they have a funded trading account for the following month.
- This process needs to continue each and every month the CME Group exchange is activated on the user's account.
Billing and Payments
In the case where you are provided a multiuser management control panel to resell Sierra Chart, payments will need to be made for the services provided.
The billing frequency is monthly. Payments will need to be made each month. You will receive an email notification reminder of this. Various payment methods are supported.
You can find transaction details and monthly invoices on the View Reseller Invoices page. Payment instructions are provided.
You can find a history of the total amount due for each month and the payments made, on the Reseller Account History page. Payment instructions are provided.
Adding and Removing Authorized Symbol Service Codes for User
These instructions explain how to add and remove authorized Symbol Service Codes for a user. These service codes control access to exchange data. This is a specialized feature used by some supported data feeds.
Only those control panels which require this functionality will have access to it. Normally most control panels do not have access to this functionality. It is only used for specialized purposes by clearing firms.
Follow the instructions below to use this feature.
- Login to your main Account Control Panel on the Login page. You will need your Account Name and Password. If you do not know what these are, contact Sierra Chart Support.
- Follow the instructions to find and edit the account that you want to add or remove authorized Symbol Service Codes for.
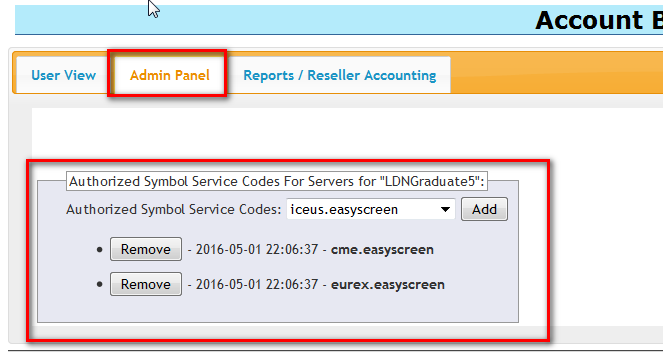
- Select the Admin Panel tab. Refer to the image below.
- On the Admin Panel, go to the Authorized Symbol Service Code for Servers for "username" form.
- To add an authorized Symbol Service Code for an account, select it from the list and press the Add button. Each of these codes refers to a particular exchange or service that you can grant authorization to for the user.
- The existing authorized Symbol Service Codes are listed. Press the Remove button beside them to remove them from the user.
- Changes to these codes go into effect within five minutes.
- After you are done making changes, contact the user and inform them to follow the Reconnect to Data Feed procedure for them to have access to new Symbol Service Codes which you have added to their account.
Order Fill Transaction Fee Billing
If you want to assume responsibility for the billing of transaction fees for live order transactions to a user account which will be billed to your Multiuser Manager account, then this is supported. Currently the only service which there are transaction fees is the Sierra Chart Futures Order Routing Service.
Your Multiuser Manager account needs to be authorized to use this feature.
Follow the instructions below to assume responsibility for the billing of transactions on a user's account.
- Login to your Multiuser Manager Administrative Control Panel if not already.
- Find the users account to begin editing it.
- Select the Admin Panel tab in the control panel.
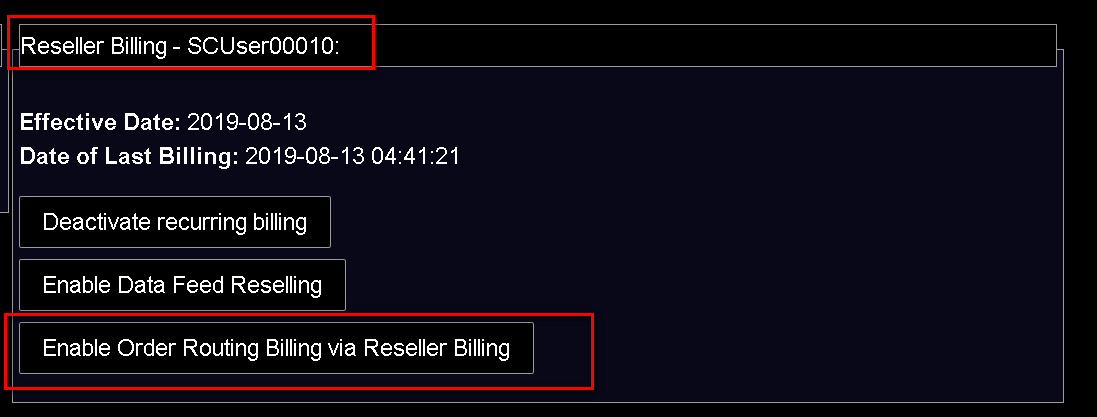
- In the Reseller Billing frame, press the Enable Order Routing Billing via Reseller Billing.
- You will notice the text Bill Order Routing Fees through Reseller Billing: Enabled indicating that the order fill billing is now billed to your own Multiuser Manager account. Refer to the image below.
Follow the instructions below to deactivate the billing to your Multiuser Manager account for transaction fees on a user's account. When this is done, the transaction fee billing will be directed to the user's own account and they will be responsible for payment from that moment forward.
- Login to your Multiuser Manager Administrative Control Panel if not already.
- Find the users account to begin editing it.
- Select the Admin Panel tab in the control panel.
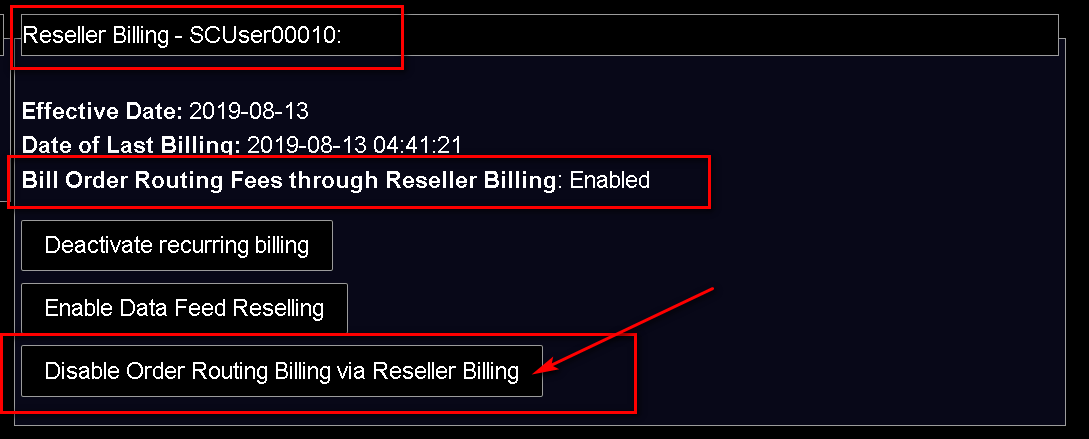
- In the Reseller Billing frame, press the Disable Order Routing Billing via Reseller Billing.
- The text Bill Order Routing Fees through Reseller Billing: Disabled will be displayed. Refer to the image below.
*Last modified Wednesday, 22nd February, 2023.